


Spring Onion Pompeii
$4.95
Allium Cepa
- Seed Count 120
- Small Flattened Bulb
- Annual
Out of stock
Email when stock available
Description
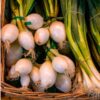
Spring Onion Pompeii seeds are perfect for any gardener keen on adding a quick, homegrown touch to their meals.
Sown in the spring to be harvested by summer, these delightful onions produce small, white, round bulbs that are just the thing for salads, stir-fries, and sandwiches.
Or you can pick them when the are a bit younger before the formation of the bulb to use just the stems and leaves.
The Pompeii’s bulbs are known for their succulent flavour, and are ready to be enjoyed just two months from planting.
They’re perfect for sowing thinly in containers or window boxes, making them a wonderful choice if you’re tight on garden space.
The onion family is a wonderful pest deterrent and planting the seeds in small groups between other plants will help you fight off the marauding insects.
Plus, these bulbs are a great size for pickling, so you will be able to enjoy them year-round.
| Method: Sow direct | Soil Temp: 10°C - 20°C |
| Cool Mountain: Sep - Apr | Position: Full sun |
| Arid: Aug - Nov | Row Spacing: 5 cm apart |
| Temperate: Jul - May | Planting Depth: 3 mm |
| Sub Tropical: Feb - Apr / Jul - Aug | Harvest: 70 days |
| Tropical: Apr - Jul | Plant Height: 50 cm |
🧅 Onion Grow Guide
Onion is a useful, space-efficient kitchen crop grown for its bulbs, stems, and green tops. It rewards patience, because it starts slowly from seed and needs steady care before it begins to swell into bulbs. Good onions come from fresh seed, fine soil, full sun, even moisture, careful weeding, and correct spacing. They dislike competition, heavy wet soil, and being rushed.
Onion seed is small and does not stay strong for as long as many other vegetable seeds, so old packets often germinate poorly. For the best results, use fresh seed and give young seedlings a protected start.
🌱 Sowing in Trays Versus Direct Sowing
Onions can be grown by direct sowing or by starting seed in trays, but tray sowing is usually the best method for home gardeners. Onion seedlings are thin, slow, and easily crowded by weeds. Raising them in trays gives better control over moisture, pests, and spacing, and it allows you to plant out only the strongest seedlings.
Sow seed into a fine seed-raising mix and cover very lightly. Keep the mix evenly moist but not waterlogged. Place the tray in bright light with good airflow. Once seedlings are tall enough to handle and have formed a small root system, they can be transplanted into prepared soil.
When transplanting, handle seedlings gently and avoid burying them too deeply. Plant them so the base sits just into the soil, with the green tops above the surface. Firm the soil lightly around the roots and water in well.
Direct sowing can work in a very fine, weed-free bed. Sow shallowly, keep the surface damp, and thin seedlings early. The main problem with direct sowing is that onion seedlings are slow and delicate, so weeds can overtake them quickly. Direct sowing is best only where the bed can be kept clean, moist, and undisturbed.
For most gardens, trays are the more reliable choice, especially if you want even rows, stronger seedlings, and better use of space.
💧 Seed Pre-Treatment
Onion seed does not need special pre-treatment. There is no need for chilling, scarifying, heat treatment, or soaking.
The most important thing is to use fresh seed. Onion seed loses strength faster than many common vegetables, so older seed may germinate unevenly or fail completely.
A short soak in clean water for a few hours can help hydrate older seed, but it is optional. If soaked, sow the seed straight away and do not let it dry out again. In most cases, fresh seed sown into moist seed-raising mix is the best approach.
🌏 Soil and Position
Onions grow best in loose, fertile, well-drained soil. The soil should be fine enough for small roots to spread easily and firm enough to support the developing bulbs. Heavy clay, compacted soil, or wet soil can lead to poor growth and rotting.
Before planting, improve the bed with compost or well-rotted organic matter. Avoid using fresh manure directly before planting, as it can encourage soft leafy growth and may increase disease problems. If the soil is acidic, onions may struggle, so a near-neutral soil is preferred.
The best position is full sun. Onions need strong light to grow sturdy leaves, and healthy leaves are what feed the bulb. Too much shade usually results in small bulbs, weak tops, and slow growth.
Onions also grow well in raised beds and containers. For pots, choose a wide container with good drainage. Depth is helpful, but width matters more if you want to grow several onions together. Use a quality potting mix and avoid letting the container dry out completely.
🪴 Care and Maintenance
Onions need steady care because they are poor competitors. Keep the bed weed-free, especially while seedlings are young. Pull weeds gently by hand so you do not disturb the shallow onion roots.
Water consistently so the soil stays lightly moist. Dry spells can slow growth and reduce bulb size, while waterlogged soil can cause rot. Once bulbs are close to maturity, reduce heavy watering so the outer skins can firm properly.
Feed onions with compost, worm castings, seaweed solution, or a balanced vegetable fertiliser. They need enough nutrients to build strong leaves early, but too much nitrogen late in growth can delay bulb ripening and produce soft bulbs that do not store well.
Do not mound soil over the bulbs. As onions swell, the tops of the bulbs may naturally sit partly above the soil. This is normal. Covering the bulbs too heavily can increase the risk of rot and poor skin formation.
If any plants send up flower stems too early, use those bulbs first. Once an onion flowers, the bulb usually becomes firmer in the centre and does not store as well.
🌼 Companion Planting Guide
Onions are excellent companions in mixed vegetable beds because their upright growth takes up little space. They are especially useful near crops that enjoy open airflow and do not heavily shade the ground.
Good companions include carrot, beetroot, lettuce, cabbage, broccoli, cauliflower, silverbeet, tomato, capsicum, strawberry, parsley, chamomile, dill, calendula, and marigold. Carrots and onions are often paired because they use space differently and can fit neatly into the same bed. Lettuce can grow nearby while onions are still small, provided it does not crowd them.
Flowers such as calendula, marigold, and alyssum help attract beneficial insects. Herbs such as dill and parsley can also support insect diversity when allowed to flower.
Avoid planting onions too close to peas, beans, and asparagus. These crops are generally not ideal companions for onions. Also avoid placing onions beside large spreading plants that shade them heavily, such as pumpkins, melons, or vigorous cucumbers.
🍽️ How to Harvest
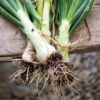
Onions can be harvested at different stages. Young plants can be pulled early and used like spring onions. For full bulbs, wait until the bulbs are well formed and the tops begin to soften, bend, and dry naturally.
To harvest, loosen the soil gently with a fork and lift the bulbs rather than pulling hard. Pulling from firm soil can snap the tops or bruise the bulb.
After lifting, allow the bulbs to cure in a dry, airy, shaded place. Spread them in a single layer with good airflow. The outer skins should become papery and the necks should dry down before storage. Do not store onions that are bruised, soft, thick-necked, or damaged. Use those first.
Once cured, trim the roots and tops, or braid the tops if they are still flexible. Store bulbs in a cool, dry, airy place. Mesh bags, baskets, racks, or hanging bunches work well. Avoid sealed plastic bags, as trapped moisture encourages rot.
⚠️ Common Issues and Fixes
| Issue | Likely Cause | Fix |
|---|---|---|
| Poor germination | Old seed, dry seed mix, or seed buried too deeply | Use fresh seed, sow shallowly, and keep evenly moist |
| Thin, weak seedlings | Not enough light, overcrowding, or poor nutrition | Provide bright light, thin seedlings, and use a gentle liquid feed |
| Seedlings falling over | Overwatering, poor airflow, or fungal disease | Improve airflow, avoid soggy mix, and water carefully |
| Small bulbs | Overcrowding, poor soil, too much shade, or weed competition | Space plants correctly, improve soil, grow in full sun, and weed often |
| Lots of leaves but poor bulbs | Too much nitrogen or unsuitable variety | Reduce high-nitrogen feeding and choose a region-suited variety |
| Bulbs rotting | Waterlogged soil, poor airflow, or bulbs buried too deeply | Improve drainage, space plants well, and avoid covering bulbs heavily |
| Flower stems forming early | Stress, temperature swings, or plants held too long before transplanting | Keep growth steady and use flowering bulbs first |
| Yellowing leaves | Natural ageing, nutrient shortage, water stress, or disease | Check soil moisture, feed gently, and remove badly affected plants |
| White patches or streaks on leaves | Thrips or sap-sucking pest damage | Hose leaves, improve plant health, use fine netting, and encourage beneficial insects |
| Leaf tips browning | Dry stress, salt build-up, wind, or nutrient imbalance | Water deeply, mulch lightly, and avoid overfeeding |
| Bulbs not storing well | Poor curing, thick necks, damage, or excess late nitrogen | Cure fully, handle gently, and use soft or damaged bulbs first |
🌾 Seed Saving Guide
Onion seed saving takes patience because onions must complete their full life cycle before seed is produced. Choose the healthiest, strongest plants with good bulb shape, firm skins, strong growth, and good storage quality. Do not save seed from weak, diseased, soft, split, or early-flowering plants.
For seed saving, selected bulbs are usually lifted, cured, stored, then replanted so they can flower. Only the best bulbs should be kept for this purpose. This selection step is important because it helps maintain quality in future crops.
When replanted, the bulbs send up tall flower stalks topped with round flower heads. These flowers attract insects and need good airflow. Stake the stems if they become tall or bend in wind.
Allow the flower heads to mature on the plant until the seed capsules begin to dry and dark seeds become visible. Watch closely, because ripe onion seed can drop if left too long. Cut the drying flower heads and place them in a paper bag or on a tray in a dry, airy place to finish drying.
Once fully dry, rub the flower heads gently to release the black seeds. Separate the seed from dry flower pieces and chaff. Make sure the seed is completely dry before storage.
Store onion seed in a labelled envelope or jar in a cool, dry, dark place. Label it with the variety description and collection year. Because onion seed loses strength quickly, aim to use saved seed while it is still fresh.
Different onion varieties can cross if flowering close together. For more reliable seed, save seed from one onion type at a time, or keep flowering varieties well separated. Select from several strong plants rather than just one, as this helps maintain vigour.
🌿 Final Thoughts
Onions are not difficult, but they do ask for patience and attention to detail. The most important steps are using fresh seed, starting seedlings carefully, planting into fine fertile soil, keeping weeds down, watering evenly, and curing bulbs properly after harvest.
Tray sowing is usually the best method because onion seedlings are slow, fine, and easily overwhelmed in the garden. Direct sowing can work in clean, well-prepared beds, but trays give more reliable results for most growers.
With full sun, steady moisture, careful spacing, and good curing, onions become one of the most valuable crops in the kitchen garden.
🧅 Spring Onion Grow Guide
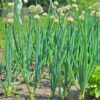
Spring onions are easy, space-saving vegetables grown for their slender stems, mild onion flavour, and fresh green tops. They are one of the most useful crops in a kitchen garden because they can be harvested young, grown close together, and used in salads, stir-fries, soups, omelettes, dumplings, noodles, marinades, and garnishes.
They are ideal for garden beds, raised beds, pots, troughs, and small spaces. Unlike large bulbing onions, spring onions are usually grown for their tender stems and leaves rather than a mature bulb. They grow neatly, take up little room, and can be harvested gradually as needed.
🌱 Sowing in Trays Versus Direct Sowing
Spring onions can be grown by direct sowing or by starting seed in trays, and both methods work well. However, sowing in trays is usually the best method for most gardeners because the seedlings are very fine when young and can be difficult to see among weeds if sown straight into the garden.
To sow in trays, fill a seed tray or small cells with a fine seed-raising mix. Sow the seed shallowly, about 5 mm deep, cover lightly, and water gently. Keep the mix evenly moist but not soggy. Spring onion seedlings look like tiny grass blades at first, so handle them gently.
Once seedlings are sturdy and easy to handle, they can be planted out in small clumps or individually. Planting in small clumps is useful if you want a fuller harvest from each space. Individual planting gives slightly larger stems and more even growth.
Direct sowing is also simple if the bed is clean and weed-free. Sow seed thinly in shallow drills, cover lightly, and water with a fine spray. Thin seedlings as they grow, using the thinnings as baby spring onions. The main challenge with direct sowing is weed competition and uneven moisture.
For most home gardens, tray sowing is preferred because it gives better control, cleaner rows, and stronger early growth.
🌾 Seed Pre-Treatment
Spring onion seed does not require special pre-treatment. There is usually no need for soaking, chilling, or scarifying.
Fresh seed is important because onion-family seed can lose strength faster than many other vegetable seeds. Use fresh seed where possible for better germination.
A short soak in room-temperature water for a few hours before sowing is optional and may help older seed germinate more evenly. If soaking, sow the seed promptly and do not leave it in water for too long, as overly wet seed can rot.
The most important factors are fresh seed, shallow sowing, steady moisture, and patience.
🌞 Soil and Position
Spring onions grow best in full sun to light partial shade. Good light encourages strong upright leaves and steady growth. In hot or exposed positions, light afternoon shade can help keep plants tender and reduce stress.
The soil should be fertile, loose, well-drained, and moisture-retentive. Spring onions have relatively shallow roots, so they need soil that holds moisture without becoming waterlogged. Before planting, improve the soil with compost, worm castings, or well-rotted organic matter.
Avoid heavy, compacted soil because it can restrict root growth and lead to thin, weak plants. If your soil is clay-based, improve it with compost and plant into a slightly raised bed if needed. If your soil is sandy, compost helps hold moisture and nutrients around the roots.
Spring onions grow very well in containers. Choose a pot or trough with drainage holes and use a quality potting mix. A long trough is especially useful because spring onions can be grown in rows and harvested gradually.
💧 Care and Maintenance
Spring onions are easy to care for, but they grow best with steady moisture and light feeding. Keep the soil evenly moist, especially while seedlings are small. Dry soil can slow growth and make stems tougher, while waterlogged soil can cause yellowing and root problems.
Mulch lightly around established plants to conserve moisture and reduce weeds. Use a fine mulch and keep it away from the base of tiny seedlings until they are strong enough.
Feed gently during active growth. Compost, worm tea, liquid seaweed, fish emulsion, or a balanced vegetable fertiliser can support steady leaf production. Avoid overfeeding with high-nitrogen fertiliser, as overly soft growth can attract pests and become weak.
Weeding is important because young spring onions do not compete well. Weed carefully by hand so the shallow roots are not disturbed.
If you want longer white stems, gently mound a little soil or fine compost around the base as the plants grow. Do this lightly and gradually, keeping soil out of the leaf centres.
🐝 Companion Planting Guide
Spring onions are excellent companion plants because their narrow upright growth fits easily between many crops. Their onion scent can also add useful diversity to mixed vegetable beds.
Good companions include carrots, beetroot, lettuce, silverbeet, spinach, tomatoes, capsicum, eggplant, cabbage, broccoli, kale, celery, parsley, chamomile, calendula, marigold, alyssum, thyme, sage, rosemary, and strawberries.
Spring onions are often paired with carrots because their different scents may help confuse some pests. They also work well along bed edges, between leafy greens, or near brassicas where they take up little space.
Avoid planting spring onions too close to beans and peas if following traditional companion planting practices. Many gardeners keep onion-family crops and legumes separated. Also avoid planting them where large spreading plants will shade them heavily.
✂️ How to Harvest
Spring onions can be harvested once the stems are large enough to use. For small tender onions, pull the whole plant gently from the soil. For larger stems, wait until the base has thickened and the leaves are strong and upright.
To harvest whole plants, loosen the soil gently with your fingers or a small tool, then pull from the base rather than yanking the leaves. Trim roots and remove any damaged outer leaves before using.
You can also harvest the green tops by cutting a few leaves from each plant, leaving the base to continue growing. This works best when plants are healthy and well established.
For a continuous harvest from a row or pot, take the largest plants first and leave smaller ones to keep growing. Thinnings from crowded seedlings can also be used as delicate baby spring onions.
⚠️ Common Issues and Fixes
| Issue | Likely Cause | Fix |
|---|---|---|
| Poor germination | Old seed, dry mix, seed buried too deeply | Use fresh seed, sow shallowly, keep evenly moist |
| Patchy germination | Uneven moisture or old seed | Keep moisture steady and sow a little extra seed |
| Seedlings collapse | Overwatering, poor airflow, fungal disease | Use clean seed mix, avoid soggy conditions, improve ventilation |
| Thin weak seedlings | Not enough light, overcrowding, low fertility | Move to brighter light, thin seedlings, feed lightly |
| Slow growth | Poor soil, dry conditions, root competition | Add compost, water consistently, weed regularly |
| Yellowing leaves | Waterlogging, nutrient shortage, old leaves | Improve drainage, feed gently, remove tired leaves |
| Brown leaf tips | Dry stress, heat, inconsistent watering, salt build-up in pots | Water evenly, mulch lightly, flush pots occasionally |
| Plants fail to thicken | Overcrowding, poor light, low nutrients | Thin plants, improve light, feed lightly |
| Root rot | Heavy wet soil or poor drainage | Improve drainage and avoid constant wetness |
| Onion thrips | Dry stressed plants and dense growth | Water consistently, remove damaged leaves, improve airflow |
| Aphids | Soft new growth attracting sap-sucking insects | Hose off gently, encourage beneficial insects, avoid overfeeding |
| Leaf spots | Damp foliage, poor airflow, crowded planting | Space plants well, water at soil level, remove affected leaves |
| Plants flowering early | Stress, dryness, crowding, plant maturity | Keep moisture steady, thin plants, harvest before quality declines |
| Stems tough or strong flavoured | Dry soil, old plants, slow growth | Harvest younger plants and water regularly |
| Weeds overtake seedlings | Slow early growth and fine seedlings | Start in trays or weed carefully while plants are young |
🌰 Detailed Seed Saving Guide
Saving spring onion seed takes patience because plants must be allowed to flower and mature fully. Choose healthy, strong plants with good flavour, upright leaves, thick stems, and no signs of disease. Avoid saving seed from weak plants, plants that flowered unusually early from stress, or plants with poor growth.
Leave selected plants in the garden instead of harvesting them. They will send up hollow flower stems topped with round flower heads. These flower heads are attractive to bees and other pollinators.
Allow the flower heads to mature on the plant. The flowers will fade and small seed capsules will form. Seed is ready when the flower head becomes dry and papery, and the small black seeds inside are hard.
Watch closely as the seed heads dry, because mature seed can fall if left too long. Cut the dry flower heads and place them upside down in a paper bag. Label the bag immediately.
Keep the bag in a dry, shaded, airy place for one to two weeks so the seed heads finish drying. Once fully dry, rub the heads gently between your fingers to release the seed.
Separate the black seeds from the dry flower material by hand or with a fine sieve. Work over a tray or sheet of paper so the small seed is not lost. Spread the cleaned seed on paper for several extra days to make sure it is completely dry.
Store seed in a labelled paper envelope or small airtight jar. Include the plant name and collection date. Keep seed in a cool, dark, dry place.
For best results, use saved seed while it is fresh. Onion-family seed often loses strength faster than many other vegetable seeds, so fresh seed gives more reliable germination. Save seed from several healthy plants rather than only one to maintain vigour.
🌿 Final Thoughts
Spring onions are practical, productive, and easy to fit into almost any edible garden. They are best started in trays because the fine seedlings are easier to protect and manage, though direct sowing also works well in a clean, prepared bed.
No special seed pre-treatment is required, but fresh seed makes a big difference. Give spring onions loose fertile soil, steady moisture, good light, and gentle feeding. Harvest them young for tender stems, cut greens as needed, or let a few strong plants flower for seed. With simple care, spring onions provide a steady supply of fresh flavour from a very small space.
3 reviews for Spring Onion Pompeii
| 5 star | 100% | |
| 4 star | 0% | |
| 3 star | 0% | |
| 2 star | 0% | |
| 1 star | 0% |

Postage Charge
Orders under $35 attract a $4.95 shipping charge. Orders $35 and above have free shipping.
Order Times
Seed orders are normally dispatched within three business days. You will receive an email when seeds are mailed out.
Postage Days
Seeds are mailed out Tuesday to Friday at 1pm. Except for the Friday of long weekends.
Postage Times
WA 2-3 Days: SA,NT 3-5 Days: NSW, ACT, QLD, VIC: 5-7 Days
Carrier
We use Australia Post Letter Postage for the majority of orders
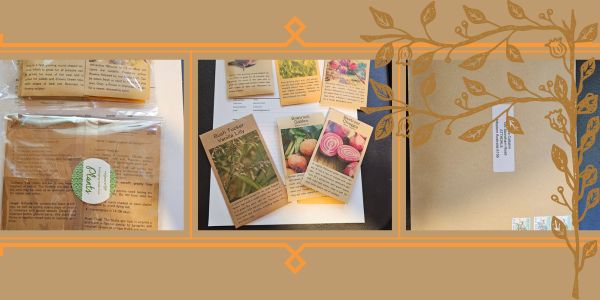
Not only are our seeds packed in recycled paper envelopes, we keep the theme going when we post out website orders. To protect your seeds from moisture and the letter box munchers (snails), we use a very special plastic free material made from plants. They are then put into recycled mailing envelopes. Green all the way ????????
Delivery Guarantee
We take great care to make sure your seeds arrive safely. If your order is lost or damaged in transit, we’ll happily send a replacement. Unfortunately, we can’t replace or refund orders that arrive later than the estimated delivery date, as delays can sometimes occur that are outside our control.
Please note that all dispatch and delivery times listed are estimates only. While we do our best to post promptly, delivery timeframes can vary due to postal service delays, weather events, or other unforeseen circumstances. We’re unable to take responsibility for any loss, damage, or cost that results from a late delivery.
An order is not considered missing until at least 20 business days have passed from the postage date. You’ll receive an email once your seeds have been posted, letting you know they’re on their way. If you don’t see it in your main inbox, please check your Spam or Promotions folders as sometimes our emails like to hide there.
See all our verified customer reviews on our official CusRev profile.
See all our verified customer reviews on our official CusRev profile.
See all our verified customer reviews on our official CusRev profile.