


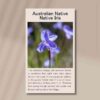

Native Iris
$6.59
Patersonia Occidentalis
- Seed Count 70
- Australian Native Wildflower
- Perennial
- Height 60 cm
In stock
Description
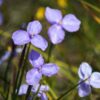
If you’re looking for a tough-as-nails plant that brings a touch of wild elegance to your garden, meet the Native Iris. This Aussie native is a real gem, thriving in conditions that might make other plants throw in the towel. It’s a quietly spectacular addition to the garden, subtle when it’s not in bloom, and absolutely striking when it is.
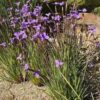
The form of the Native Iris is a big part of its charm. It grows in a neat clump, with long, strappy foliage and from the centre of that leafy base rise elegant flower stems, topped with vivid purple blooms that look like miniature irises.
The plant grows from a sturdy underground rhizome, which is a bit like its own built-in survival kit. That rhizome stores energy and moisture so it can tough out dry periods and bounce back after the odd rough patch. It’s a clever bit of plant design that is perfectly suited to our often unpredictable Australian climate.
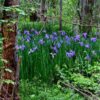
You’ll find Patersonia occidentalis naturally growing across southern parts of Australia, especially in Western Australia, but it’s proven itself to be versatile and reliable in gardens right across the temperate and Mediterranean-style zones of the country. It’s well adapted to sandy, free-draining soils, exactly the kind of ground where other plants might struggle. And once established, it needs very little water to keep going. And don’t worry if your winters get a bit nippy. Native Iris is frost-hardy to light frosts, so it’s suitable in a range of climates, from coastal areas to inland zones with a bit of chill.
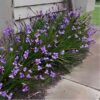
It’s versatility is another feather in its cap. It fits beautifully into a range of garden styles. In a native or bush-style garden, it blends in seamlessly being low-fuss, locally adapted, and quietly beautiful. In a cottage garden, it offers a soft, natural texture that pairs well with other perennials. And in coastal gardens, where wind and salt spray can challenge more delicate plants, it stands firm.
It also works brilliantly in mass plantings, where those bursts of purple have maximum impact, or as a border plant alongside paths, garden beds, or even rockeries. And because it doesn’t sprawl or run wild, it keeps its shape without much need for trimming or tidying.
In a world of fussy ornamentals and fast-fading trend plants, the Native Iris is a gardener’s plant through and through. It’s not trying to be a showstopper—it just ends up being one through resilience, adaptability, and understated beauty. It brings a kind of authentic charm to the garden, and once you’ve grown it, you’ll find yourself coming back to it again and again.
| Method: Seedlings | Soil Temp: 15°C - 23°C |
| When: Cool Mountain Nov - Dec | Position: Full sun |
| When: Temperate Sep/Nov, Mar/June | Soil: Average, good drainage |
| When: Sub Tropical May - Oct | Planting Depth: 3mm |
| When: Arid Aug - Jan | Row Spacing: 30cm apart |
| When: Tropical Not Recommended | Plant Height: 60cm |
🌸 Native Iris Grow Guide
Native iris is a graceful clumping perennial grown for its upright strap-like leaves and delicate, often purple-toned flowers. It brings a soft wildflower feel to native gardens, cottage borders, rockeries, habitat plantings, and low-maintenance beds. The flowers are usually short-lived individually, but mature plants can produce a lovely succession of blooms across their flowering period.
This plant is best treated as a fine-rooted, clump-forming native perennial rather than a lush bedding plant. It prefers good drainage, modest feeding, and a position where it is not smothered by aggressive neighbours. Once established, native iris can be hardy and long lived, but young seedlings need patience and careful moisture control.
🌱 Sowing in Trays vs Direct Sowing
Native iris is best started in trays, tubes, or small pots rather than sown direct into the garden. The seed can be slow and uneven to germinate, and tiny seedlings are easily lost among weeds, mulch, ants, birds, drying winds, or heavy rain. Tray sowing gives far better control over moisture, drainage, pests, and early root development.
Use a free-draining native seed-raising mix. A sandy mix is ideal, as native iris dislikes heavy wet conditions around the roots. Sow the seed shallowly, then cover with a very light layer of fine mix, sand, or vermiculite. Water gently so the seed is settled but not washed away. Keep the mix lightly moist, never soggy.
Small tubes or deeper cells are especially useful because native iris seedlings form fine roots that benefit from depth and minimal disturbance. Once seedlings are large enough to handle and have made a strong root system, they can be moved into individual pots or planted into the garden.
Direct sowing is possible in a prepared native garden bed, but it is much less reliable. It works only where the soil is weed-free, sandy, protected, and easy to monitor. Even then, it can be difficult to know whether seed has failed or is simply taking its time.
Best choice: sow in trays or tubes first. This gives the highest chance of success and protects the seedlings through their most vulnerable stage.
🔥 Seed Pre-Treatment
Native iris seed may germinate without treatment, but smoke treatment is strongly recommended because it can improve germination and help wake dormant seed.
The easiest method is to use smoke water, smoke granules, or smoke-infused vermiculite. Follow the product directions carefully, as strengths vary. A gentle soak in smoke water before sowing, or a layer of smoke-treated vermiculite over the seed, is usually enough.
Do not use boiling water treatment. Native iris seed is not suited to harsh heat treatment, and excessive heat may damage the seed. Scarifying is usually unnecessary and risky because small seed can be easily injured.
After treatment, patience is important. Germination may be uneven, with some seedlings appearing much later than others. Keep trays for longer than you would with quick vegetable crops, as late germination is common with many native perennials.
☀️ Soil and Position
Native iris grows best in well-drained soil with a sandy, gravelly, or loamy texture. It does not like sitting in wet, compacted ground. If your soil is heavy, grow it in a raised bed, mound, rockery, or large pot filled with a native-friendly free-draining mix.
A position in full sun to light shade is suitable. Full sun encourages stronger flowering, while light shade can help protect plants from harsh exposure. Too much shade may produce lush leaves but fewer flowers.
The soil should be low to moderately fertile. Avoid rich manure, heavy compost, and standard high-phosphorus fertilisers. These can cause weak growth, root stress, or poor plant health. Use only a native-safe, low-phosphorus fertiliser if feeding is needed.
Good airflow is helpful. Native iris grows as a clump, so it should not be crowded by dense groundcovers or vigorous shrubs. Allow enough space around each plant for leaves to arch naturally and for moisture to dry from the crown after rain or watering.
🌿 Care and Maintenance
Water seedlings and young plants regularly while they establish. The soil should stay lightly moist, but never waterlogged. Once established, native iris becomes tougher and can handle drier periods, especially if planted in suitable soil.
Mulch lightly around the plant to reduce weeds and protect the soil surface. Use coarse mulch, gravel, or open native mulch rather than fine, wet material that packs tightly. Keep mulch away from the centre of the clump so the crown stays dry and healthy.
Feeding should be minimal. A light application of native-safe fertiliser is enough if growth is pale or weak. Overfeeding can make the plant soft and floppy.
Remove old flower stems after flowering if you do not want seed. If you want to collect seed, leave selected stems in place until capsules mature. Old leaves can be gently trimmed or pulled away once fully dry, but avoid cutting hard into the centre of the clump.
Mature plants may slowly expand into larger clumps. If a clump becomes congested or flowering declines, it can be divided carefully. Replant firm outer sections with healthy roots and discard tired or woody centres.
🐝 Companion Planting Guide
Native iris works beautifully with plants that enjoy similar drainage, light, and low-fertility conditions. It is especially useful in layered native gardens where fine foliage, flowers, and habitat value are important.
Good companions include kangaroo paw, billy buttons, everlasting daisies, fan flower, native violet in lightly shaded spots, blue flax lily, native grasses, wax flower, tea tree, correas, grevillea, coastal rosemary, and small native daisies. These plants create a naturalistic planting style and help attract pollinators and beneficial insects.
Native iris also looks attractive beside rocks, gravel paths, dry creek beds, and open mulch areas where its upright leaves can contrast with lower spreading plants.
Avoid planting it beside thirsty vegetables, lawn edges, bog plants, or vigorous plants that need rich soil and frequent watering. It is also best kept away from aggressive groundcovers that may smother small clumps.
✂️ How to Harvest
Native iris is mostly grown as an ornamental and habitat plant, but flowers and seed can be harvested carefully.
For small floral use, cut flower stems when buds are showing colour or when fresh flowers have opened. Use clean scissors or secateurs and harvest in the cooler part of the day. The flowers are delicate and may not last as long as commercial cut flowers, so they are best enjoyed in small, natural arrangements.
For seed harvesting, leave some flowers on the plant. After flowering, seed capsules will form along the stems. These should be allowed to mature and dry before collection. Harvest too early and the seed may not be viable.
Do not overharvest young plants. Let them build strong clumps first. Once mature, light cutting and seed collection will not harm a healthy plant.
⚠️ Common Issues and Fixes
| Issue | Likely Cause | Fix |
|---|---|---|
| Poor germination | No smoke treatment, old seed, seed buried too deeply, or uneven moisture | Use smoke treatment, sow shallowly, keep lightly moist, and be patient |
| Seed rots before sprouting | Mix too wet or poorly drained | Use a sandy seed mix, reduce watering, and improve airflow |
| Seedlings collapse | Damping off from excess moisture and poor ventilation | Use clean trays, avoid overwatering, and keep seedlings in bright airy conditions |
| Slow seedling growth | Natural slow growth, low light, or cool conditions | Provide bright light, steady moisture, and avoid overfeeding |
| Yellowing leaves | Waterlogged roots, poor drainage, or unsuitable fertiliser | Improve drainage, reduce watering, and use only native-safe fertiliser |
| Brown leaf tips | Dry stress, salt build-up, wind exposure, or fertiliser burn | Water deeply when needed, flush pots occasionally, and avoid strong fertiliser |
| Root rot | Heavy wet soil or mulch packed into the crown | Replant into raised free-draining soil and keep mulch away from the clump centre |
| Few flowers | Too much shade, young plant, or excess nitrogen | Increase light, allow the plant to mature, and reduce feeding |
| Floppy growth | Too much fertility, shade, or crowding | Reduce fertiliser, improve light, and give plants more space |
| Snail or slug damage | Young seedlings exposed in damp areas | Protect trays, remove hiding places, and use physical barriers |
| Plants fail after transplanting | Root disturbance or sudden exposure | Transplant gently, harden plants off first, and water carefully until settled |
🌾 Detailed Seed Saving Guide
Saving seed from native iris is simple once plants are mature enough to flower well. Choose the strongest and healthiest plants for seed collection. Good seed plants should have strong clumps, healthy leaves, good flowering, and no major pest or disease problems.
After flowering, leave selected flower stems on the plant so seed capsules can form. The capsules need time to mature fully. They are ready when they become dry, firm, and begin to brown. Watch closely as they approach maturity, because dry capsules may split and drop seed.
To collect seed, cut the mature stems and place them upside down in a paper bag. You can also tie a small paper bag over drying capsules while they are still on the plant, which helps catch seed as the capsules open naturally.
Place collected stems or capsules in a dry, shaded, airy spot until fully dry. Once dry, gently crush or open the capsules over a clean tray. Separate the seed from the dry chaff by hand sorting or using a fine sieve. Work slowly, as the seed can be small and easy to lose.
Before storage, make sure the seed is completely dry. Store it in a labelled paper envelope inside an airtight jar. Keep the jar in a cool, dark, dry place. Label with the plant name and collection date.
For best results, sow saved seed while it is fresh. When sowing, use smoke treatment again to improve the chance of strong germination. Keep seed trays for an extended period, as germination may be slow and staggered.
🌼 Final Thoughts
Native iris is a beautiful plant for gardeners who enjoy subtle flowers, fine foliage, and resilient native-style planting. It is not the fastest plant from seed, but it rewards patience with elegant clumps, delicate blooms, and long-term garden value.
The keys to success are tray sowing, smoke treatment, free-draining soil, low-phosphorus feeding, careful watering, and patience. Give young seedlings protection while they establish, then plant them into an open, well-drained position where they can mature without crowding. Once settled, native iris becomes a graceful and dependable addition to waterwise borders, wildlife gardens, and naturalistic plantings.
1 review for Native Iris
| 5 star | 100% | |
| 4 star | 0% | |
| 3 star | 0% | |
| 2 star | 0% | |
| 1 star | 0% |

Postage Charge
Orders under $35 attract a $4.95 shipping charge. Orders $35 and above have free shipping.
Order Times
Seed orders are normally dispatched within three business days. You will receive an email when seeds are mailed out.
Postage Days
Seeds are mailed out Tuesday to Friday at 1pm. Except for the Friday of long weekends.
Postage Times
WA 2-3 Days: SA,NT 3-5 Days: NSW, ACT, QLD, VIC: 5-7 Days
Carrier
We use Australia Post Letter Postage for the majority of orders
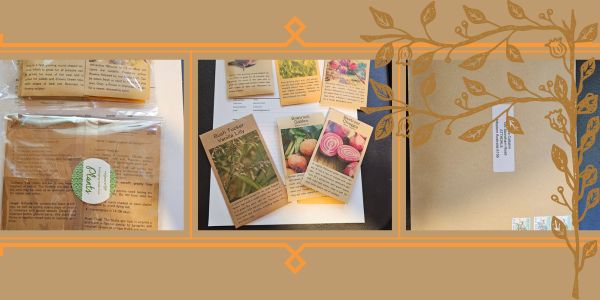
Not only are our seeds packed in recycled paper envelopes, we keep the theme going when we post out website orders. To protect your seeds from moisture and the letter box munchers (snails), we use a very special plastic free material made from plants. They are then put into recycled mailing envelopes. Green all the way ????????
Delivery Guarantee
We take great care to make sure your seeds arrive safely. If your order is lost or damaged in transit, we’ll happily send a replacement. Unfortunately, we can’t replace or refund orders that arrive later than the estimated delivery date, as delays can sometimes occur that are outside our control.
Please note that all dispatch and delivery times listed are estimates only. While we do our best to post promptly, delivery timeframes can vary due to postal service delays, weather events, or other unforeseen circumstances. We’re unable to take responsibility for any loss, damage, or cost that results from a late delivery.
An order is not considered missing until at least 20 business days have passed from the postage date. You’ll receive an email once your seeds have been posted, letting you know they’re on their way. If you don’t see it in your main inbox, please check your Spam or Promotions folders as sometimes our emails like to hide there.

See all our verified customer reviews on our official CusRev profile.